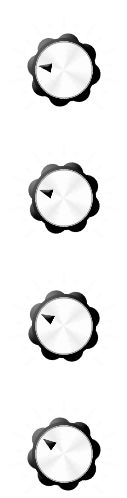
With Zac having successfully made a test library, we began the recording process. We used a 4 piece drum kit with a large variety of cymbals, both from the university cymbal pack and Zacs own. We decided this would give users a wider variety of options when tweaking the library (Fig. 1)

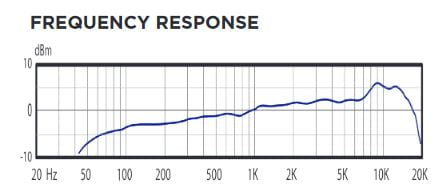
We set up the kit in the main live room in studio 1, using a rug and dividers to prevent standing waves and unwanted resonances. The snare was close miced on the top and bottom using an Audix i5 and Shure SM57 respectively. For the toms we used an Audix D2 on the rack and a D6 on the floor tom, the kick was miced with a D4. We swapped the D4 and D6 from their standard recommended setup as we found the D6 lacked the attack we wanted for the kick and enhanced the power in the low end for the floor tom. We decided to close-mic the main high-hats to give the user more flexibility when placing them in the mix and used an Audix ADX51 small-diaphragm condenser. The ADX51 was well suited for this application as it has a maximum SPL of ≥132 dB as well as an emphasised top end response (see fig. 2). Lastly, we used a matched pair of AKG C414s as a stereo pair of room mics as well as a Neumann U87 as a mono ambient room mic. This combination was particularly useful as we desired a strong sense of space in the sample library creating the sense of natural drums.
Once set up we level checked each mic to ensure no clipping and sufficient headroom. Then each mic was routed through the desk into Ableton where we began tracking. For each individual drum or cymbal, we recorded several individual hits, starting with the most light to the hardest hits, ensuring we allowed the tails to ring out fully. While we recorded each individual element separately we recorded all the mics simultaneously. This allowed us to mix bleed from each track together giving a sense of cohesion and realness as well as allowing us to implement a bleed control function in the future.